How to setup a JAX/Tensorflow 1.15 environment in the FASRC Cluster
Update 2023.07.17 - Due to a cluster update, some of the packages here does not exist, @cschesch kindly shared the process that worked for him in the comment below. The general process is the same, feel free to get to know about FASRC modules below.
Note : This guide is only for setting up TF in the FASRC Cluster. I followed the official documentation listed in the references. Skip to that section if you want to learn more.
Background info
I had a lot of trouble trying to setting up JAX/old tensorflow versions on FASRC cluster. What I later realized was that, that since there are lots of diverse projects being done in FAS, there are many modules supported in the cluster which can be imported from a single command. 😆❤️
Ok, now let's proceed with installing tensorflow 1.15.
Identify which CUDA and cuDNN versions are required by the tensorflow version you need to install. (in our specific case, we need CUDA 10.0 and cuDNN 7.4)
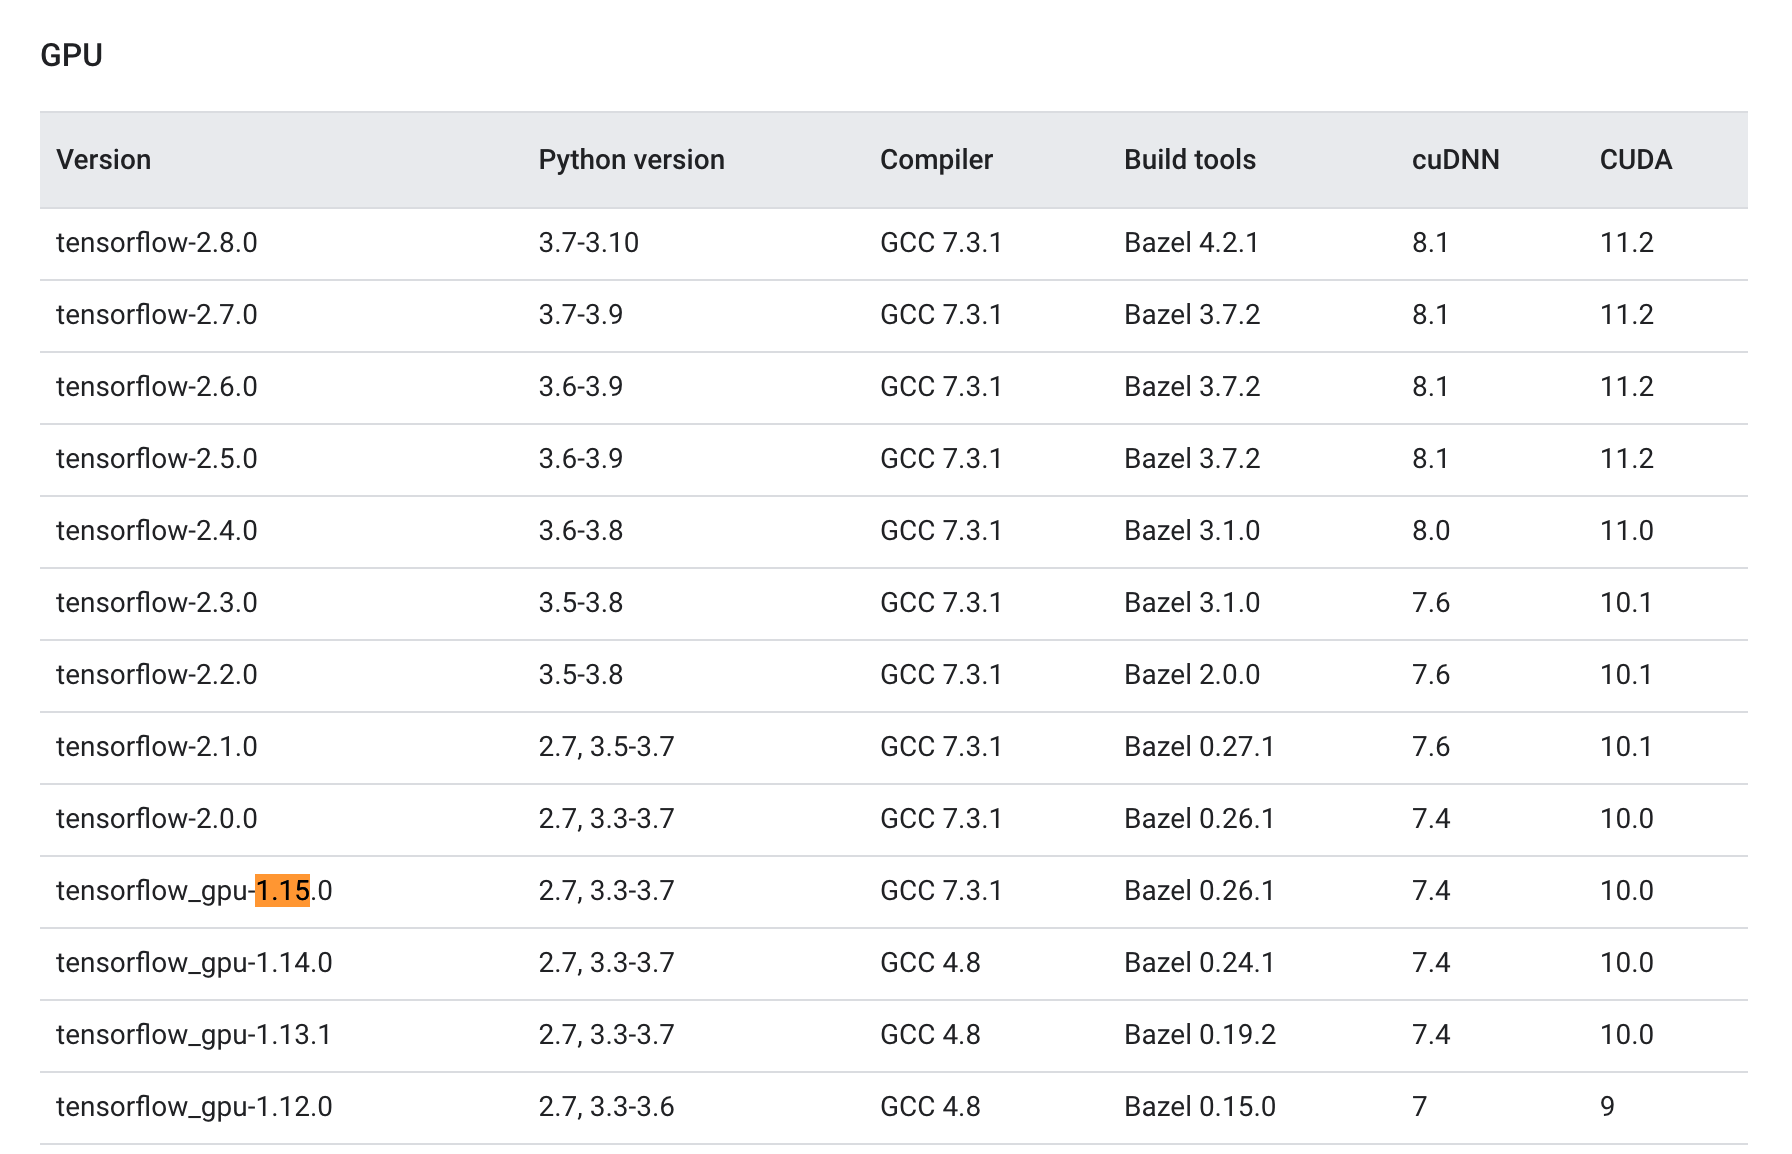
So now we know that tensorflow_gpu-1.15 needs CUDA 10.0 and cuDNN 7.4
1. Identify FASRC Modules to load
In FAS-RC we can load additional runtime libraries (cublas, cufftw, …). To see what's available, you can run the command module-query cuda. After that we can identify that we need,
cuda/10.0.130-fasrc01cudnn/7.4.1.5_cuda10.0-fasrc01
Identify which versions are available
[ramith@xxxxxxx ~]$ module-query cuda

-----------------------------------------------------------------------------------------------------------------------------
  cuDNN
-----------------------------------------------------------------------------------------------------------------------------
    Description:
      The NVIDIA CUDA Deep Neural Network library (cuDNN) is a GPU-accelerated library of primitives for deep
      neural networks.

    Versions:
      HeLmod CentOS 7
            cudnn/5.1_cuda8.0-fasrc01............... x86-64 binary built against cuda 8.0
            cudnn/6.0_cuda7.5-fasrc01............... x86-64 binary built against cuda 7.5
            cudnn/6.0_cuda8.0-fasrc01............... x86-64 binary built against cuda 8.0
            cudnn/7.0.5_cuda8.0-fasrc01............. x86-64 binary built against cuda 8.0
            cudnn/7.0.5_cuda9.1-fasrc01............. x86-64 binary built against cuda 9.1
            cudnn/7.0_cuda9.0-fasrc01............... x86-64 binary built against cuda 9.0
            cudnn/7.1_cuda9.0-fasrc01............... x86-64 binary built against cuda 9.0
            cudnn/7.3.1.20_cuda10.0-fasrc01......... x86-64 binary built against cuda 10
            cudnn/7.4.1.5_cuda10.0-fasrc01.......... x86-64 binary built against cuda 10
            cudnn/7.4.1.5_cuda9.0-fasrc01........... x86-64 binary built against cuda 9.0
            cudnn/7.4.1.5_cuda9.2-fasrc01........... x86-64 binary built against cuda 9.2
            cudnn/7.6.5.32_cuda10.0-fasrc01......... x86-64 binary built against cuda 10.0
            cudnn/7.6.5.32_cuda10.1-fasrc01......... x86-64 binary built against cuda 10.1
            cudnn/7.6.5.32_cuda10.2-fasrc01......... x86-64 binary built against cuda 10.2
            cudnn/8.0.4.30_cuda11.0-fasrc01......... x86-64 binary built against cuda 11.0.3
            cudnn/8.0.4.30_cuda11.1-fasrc01......... x86-64 binary built against cuda 11.1
            cudnn/8.1.0.77_cuda11.2-fasrc01......... x86-64 binary built against cuda 11.2


    To find detailed information about a module, search the full name.

      module-query cudnn/8.1.0.77_cuda11.2-fasrc01

    You may need to specify the build "flavor" to get a single record

      module-query cudnn/8.1.0.77_cuda11.2-fasrc01 --flavor 'HeLmod CentOS 7'


-----------------------------------------------------------------------------------------------------------------------------
  CUDA
-----------------------------------------------------------------------------------------------------------------------------
    Description:
      Module that activates the CUDA libraries

    Versions:
      HeLmod CentOS 7
            cuda/7.5.18-fasrc01..................... install cuda toolkit and samples
            cuda/8.0.61-fasrc01..................... install cuda toolkit and samples
            cuda/9.0-fasrc02........................ install cuda toolkit and samples
            cuda/9.1.85-fasrc01..................... install cuda toolkit and samples
            cuda/9.2.88-fasrc01..................... install cuda toolkit and samples
            cuda/10.0.130-fasrc01................... install cuda toolkit and samples
            cuda/10.1.243-fasrc01................... install cuda toolkit and samples
            cuda/10.2.89-fasrc01.................... install cuda toolkit and samples
            cuda/11.0.3-fasrc01..................... install cuda toolkit and samples
            cuda/11.1.0-fasrc01..................... install cuda toolkit and samples
            cuda/11.4.2-fasrc01..................... install cuda toolkit and samples
      Easy Build
            CUDA/9.2.88.............................
            CUDA/10.0.130...........................


    To find detailed information about a module, search the full name.

      module-query CUDA/10.0.130

    You may need to specify the build "flavor" to get a single record

      module-query CUDA/10.0.130 --flavor 'Easy Build'
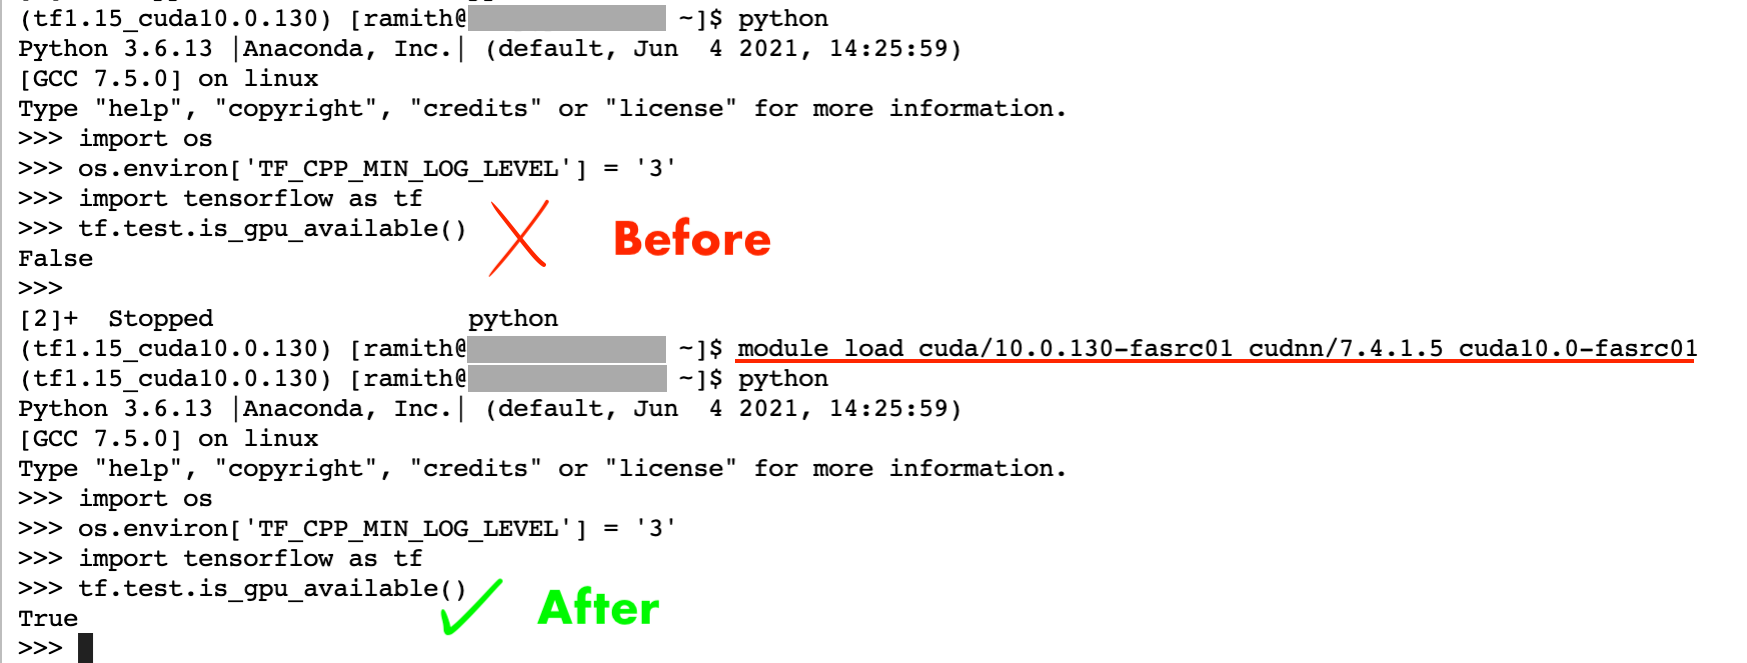
Load the selected CUDA and cuDNN version
module load cuda/10.0.130-fasrc01 cudnn/7.4.1.5_cuda10.0-fasrc01
2. Create Environment
conda create -n tf1.15_cuda10.0.130 python=3.6 numpy six wheel
3. Activate the conda environment & Install Tensorflow
source activate tf1.15_cuda10.0.130
pip install --upgrade tensorflow-gpu==1.15
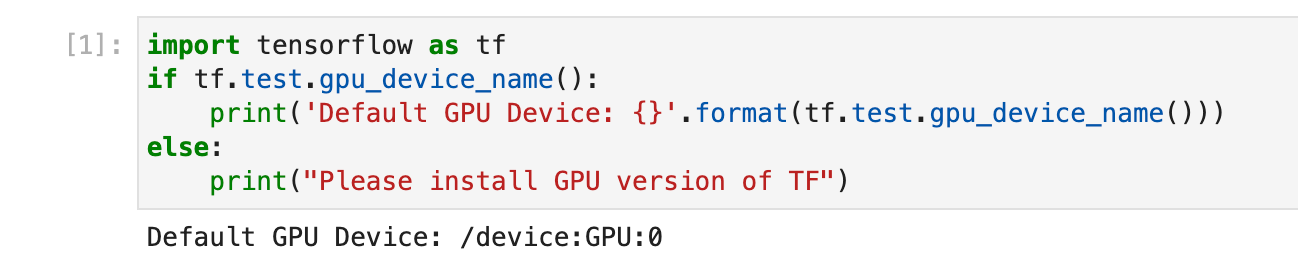
4. Check if tensorflow uses GPU 👀
(tf1.15_cuda10.0.130) [ramith@xxxxxx ~]$ python
Python 3.6.13 |Anaconda, Inc.| (default, Jun  4 2021, 14:25:59)
[GCC 7.5.0] on linux
Type "help", "copyright", "credits" or "license" for more information.
>>> import os
>>> os.environ['TF_CPP_MIN_LOG_LEVEL'] = '3'
>>> import tensorflow as tf
>>> tf.test.is_gpu_available()
True
5. Add new environment to Jupyter Lab (so that we can select it)
conda install -c anaconda ipykernel -y
python -m ipykernel install --user --name=fyp_env
6. Working in JupyterLab ?
~As of now, even thought tensorflow used gpu, while it ran in the terminal, it didn't work in jupyter 😬, I'll update the guide if I find a solution.
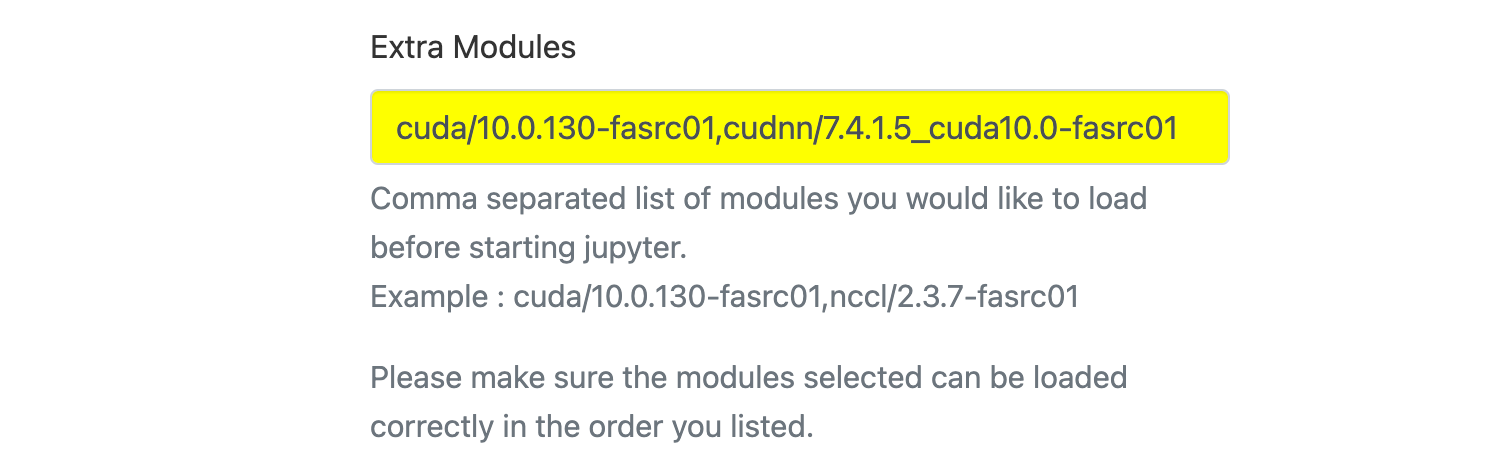
Ok found the solution! So here's the thing. Before you start the Jupyter Lab instance, you can actually specify which modules to load!
7. JAX ?
Initially I had lots of issues like the following,
Unimplemented: DNN library is not found.Couldn't invoke ptxas --version
The issue was that I couldn't get cuDNN to work. Tried various things, editing PATH variables etc 😆, nothing seemed to work. Ultimately I got it working by loading cudnn/8.1.0.77_cuda11.2-fasrc01 when creating the jupyter environment, which was pretty straightforward!! 😃
Important ❗️
Everytime you connect to the cluster, you will need to load those additional CUDA and cuDNN modules like shown below or when you create the notebook you need to specify the modules (as shown above).
[ramith@xxxxxxx ~]$ module load cuda/10.0.130-fasrc01 cudnn/7.4.1.5_cuda10.0-fasrc01
[ramith@xxxxxxx ~]$ source activate tf1.15_cuda10.0.130